Help: How to create a game
– Creating a game step-by-step
Game Graphics
- Inserting graphics to a game:
images and animations
Don't miss
The game graphics: Basic advices and practices
In each game created in the GameStylus system, you can use two types of graphics:
1) Backgrounds – backgrounds of scenes
2) Images - everything else
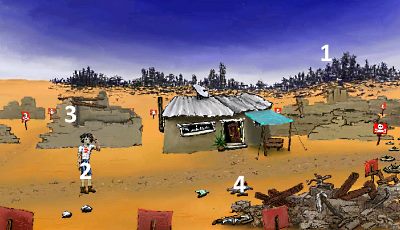
 You can see some examples here in the picture: The number 1 is background. Other numbers indicate images, namely: 2 - main hero, 3 - collapsed building, behind which the hero can pass (this building may be part of the background, but must also exist as a separate graphic element - just for the hero to be able to go behind it), 4 - animated fireplace.
How to create the graphics
Graphics can be created in any graphic editor. If you are using a PC, then - in addition to well-known commercial software – you can use PhotoPos Pro, Gimp or Paint.Net (highly recommended, able to save 256-color PNG images), which are free. Alternatively, you can use Inkscape for vector graphics and then convert it into proper bitmap graphics (JPG or PNG). For some kind of games, you can use even your own photos.
Backgrounds of the scenes
The most important graphical element of every scene is the background. It shows everything a player can see on the scene, except for variable objects. So, for example, items to pick-up and animations are not a part of the background. Background images have a resolution of 1280 x 720 pixels (dots; the pixels have an aspect ratio of 1:1) and a graphic jpg format and the maximum size of 500 kB (0.5 MB).
How to upload backgrounds
In the web editor, in the top menu, click Backgrounds. Click Browse to choose files (jpg images) in your computer you want to upload. And confirm. Once all the background images are uploaded, they appear in the list. Then you can leave or upload other background images. You can also rename or delete the backgrounds if you wish to do so.
How to use backgrounds
Once the backgrounds are uploaded, they can be assigned to the appropriate scenes (locations). Just click Locations in the top menu and click Edit at the location you want to edit (if there is just the location For tests and common animations then click the button Insert a New Location). In the main menu (in the center of the screen), you can now choose any background from the uploaded ones. The selected background then appears in the scene.
Images
As already mentioned, by images we mean everything a player can see except for the backgrounds. All individual steps of any animation are images, our hero is an image (or, more probably, a set of images), all items to collect are images etc. In one image there may be more sub-images; For example, it is useful to have one image with all steps (frames) of an animation. And you can have one other image with all static objects shown in one scene. Images can have any resolution, must be in the graphic format png (256 colors/8-bit is recommended to save memory) and have the size less than 500 kB (0.5 MB).
When converting images to 256 colors , be careful not to significantly deteriorate their quality. Sometimes it can be useful to reduce the so-called dithering. In the case of color-intensive files the only suitable solution may be to keep them in full color.
Images should be as small as possible, do not leave too big of an unused space in them. If there are many sub-images in an image, put them as close together as possible! The recommended maximum width/height of any image is 2000 pixels, more commonly; however, it should be much smaller. When exceeding the specified dimensions, the GameStylus system displays a warning. Even with the larger images, you can run your game, but it may unnecessarily occupy too much memory.
In most cases it will be a good idea to use transparent background; this way only the actual drawing is visible (e.g. a figure, an item to be taken), not any background used in the drawing.
Advice how to draw objects which will be collected (for display in inventory) can be found here. Please keep in mind that for one item there can exist multiple images - eg. one for display in the scene, the other for display in the inventory and the third for display in another scene.
How to upload images
In the editor, click Images in the top menu. Click Browse, choose files (png images) in your computer you want to upload and confirm. Once all the images are uploaded, they are displayed in the list. Then you can rename them, split them to sub-images or delete them if you don’t need them anymore.
How to split the images – and why
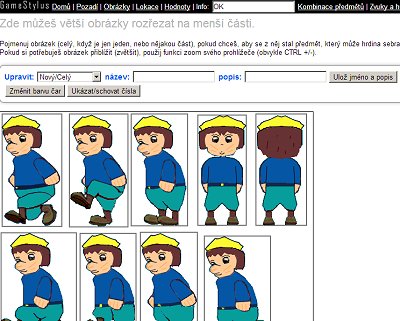
 As has already been said, one image may contain more sub-images. If you want to split an image just press the button Split the image.
Now use the mouse to mark the upper left corner of a sub-image (move the cursor to the appropriate position and click), wait a moment for the system to store the cut and then do the same for the lower-right corner. You can always see helping lines from the cursor, which will help you to find the right position of the mouse for the cut. This way you can mark/cut all sub-images.
If you want to make any changes later, just select the appropriate point you want to change (the selector is at the Edit label), click anywhere to delete the old cut and click again to make the new cut. The change will be saved immediately.
The numbers of the sub-images can be displayed by pressing the button Show/Hide numbers. If you don‘t like the color of the lines for labeling (for example, because you have chosen a dark background), simply change it - just click Change Color of Lines.
You can see some more options here - to change the name and the description of the sub-image. They are needed when you want to create an item that can be taken by the player and we will talk about it later.
How to use the images
The images, like the backgrounds, can be inserted into individual scenes/locations. If you are creating an animation of the main character (hero of your game), use the location called For tests and common animations. Otherwise, use the location where the images will be shown in the game.
Select the right location and in the main menu use the button Add objects to the scene (for still images), or Add anim. Objects to the scene (for animated images). For more details, please see the article Inserting graphics and animations.
Tip: For easy editing
If you need to enlarge the images/scenes in the editor, use the standard zoom function of your web browser. Usually you can zoom in by pressing CTRL + and zoom out by pressing CTRL -. Alternatively, you can hold CTRL and rotate the scroll wheel of your mouse. This option is usually also available in the menu of any internet browser.
